Showing posts with label Art Club. Show all posts
Showing posts with label Art Club. Show all posts
9.3.13
Art Club Ink Creatures and Other Things
Inspired by a post on ink creatures at a faithful attempt, I decided to do some of our own during Intermediate Art Club (Grades 3-7). Students each recieved a piece of thick white sulphite drawing paper, half a straw, and a bowl of India ink with a brush. After blobbing the ink onto their paper with the brush, they blew hard through the straw in different directions. Their shapes/creatures/hair emerged! Details such as eyes and fangs were added with Sharpies.
5.2.13
Heart-Shaped Boxes
It was a very messy art club today! Glue everywhere! We are in the process of making some heart boxes from clay molds. First, students formed a heart shape with clay, then covered it with plastic wrap, and finally added two layers of gooey papier mache. Next week, I'll slice the boxes in half and students will use acrylics to paint them. Thank you to Kathy @ art projects for kids for this idea.
Here are some pictures from the following week when I sliced the boxes open. I used a sharp utility knife to do so. Students then wiggled the hearts off of their molds, removed some of the plasic wrap that remained and then used acrylic paints to finish them. A couple of coats were needed.
8.5.12
Patio Stones

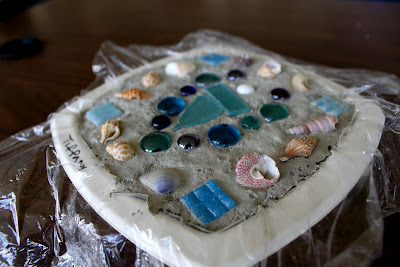
I saw this idea for patio stones on Pinterest and decided to give it a go for a Mother's Day Art Club project. To be honest, I was a little apprehensive about using concrete, but these ended up being pretty easy and the clean-up wasn't too bad either.
First, it was near impossible to find a bag of concrete in downtown Vancouver (even at my nearest Home Depot!). I was about to give up-it was late and the night before I was going to do the project but my husband volunteered to go out on a motorcycle ride to find some. Thanks, husband!
Lucky for me, I didn't have to mix up the concrete either! One of my Art Club volunteers said she would do it. She didn't follow the recipe for the whole 30 pound bag, but just began with a little water in a mop bucket and started adding concrete little by little until it was the consistency of a thick milkshake.
I found some great square-ish paper bowls, and we lined them with plastic wrap to prevent sticking/absorption. Students were to make a little sketch of their design on paper before getting their concrete. One they had it planned out, concrete was ladled in to the bowls, almost to the rim and then tapped down onto the table to minimize air bubbles. Then students got to choose from an assortment of glass beads, shells, sea glass, and mosaic tiles that I found at the craft store. The embellishments were pushed in so that they were almost flat with the concrete. (Some students that took too long committing to a design had trouble pushing in their objects because their concrete dried out too much .)
After about two days of drying on the window sill, I removed the stones from the bowls, along with the plastic wrap (most of it came off) and then placed them upside down to dry out a little more. They really only needed one more day to finish drying.
I think these turned out great...although some might be a little hard on the feet. :)
11.2.12
Art Club's Sharpie Tie-Dye
I've done this activity twice now with my intermediate art club students. It's pretty easy to do, satisfying and successful for all my grade ranges (Grade 3s-7s), and looks amazing. I got the original directions from http://blog.sharpie.com/2008/11/sharpie-to-tie-dye-for/
Subscribe to:
Posts (Atom)
.jpg)
.jpg)
.jpg)
.jpg)
.jpg)
.jpg)
.jpg)
.jpg)


